Table of Contents
- Overview & Philosophy
- Getting Started
- The Workspace Layout
- Chatting with Muse
- AI Edits & Previews
- Tracks & Projects
- Piano Roll and Playback
- Manual MIDI Editing
- MIDI Input Methods
- Downloading MIDI
- Keyboard Shortcuts Glossary
- Settings & Preferences
- Troubleshooting & FAQ
1. Overview & Philosophy
What is Muse?
Muse is an AI-native music composition workspace designed for natural human-AI collaboration.
It features an AI agent powered by state of the art LLMs like GPT-5.4, Gemini 3, or Claude, alongside a fully-featured MIDI editor and over 100 built in multisampled instrument presets.
Core Concept
At its heart, Muse consists of two complementary components
- AI Agent: Describe your musical ideas in natural language to an AI agent. Muse composes, edits, and refines based on your prompts and the context of your project.
- MIDI player and editor: View and edit the resulting MIDI directly. Make manual adjustments, upload and record MIDI, adjust instruments, or ask Muse to iterate further.
Who is it for?
- Beginners: Get started making music with a lightweight and easy to use platform.
- Producers: Use Muse alongside your DAW to quickly sketch arrangements, generate variations, build on your existing MIDI, or explore harmonic ideas.
- Students: Muse's deep understanding of composition and music theory make it a great education tool for learning how to compose.
- Composers: Iterate quickly and find ideas you otherwise wouldn't with an AI that understands music theory and emotional intent.
2. Getting Started
Your First Session
When you first open Muse, you’ll see the Start view. This is your launchpad.
- Pick a prompt (suggested or custom) or upload/record MIDI.
- Muse creates a project, a track, and a chat automatically. Tracks and chats are scoped to the project.
- The workspace opens with the piano roll in the center and the chat panel on the side.
- Muse composes based on your prompt (and optionally the MIDI you upload/record). You’ll see notes appear in the piano roll as they’re generated.
The Start View
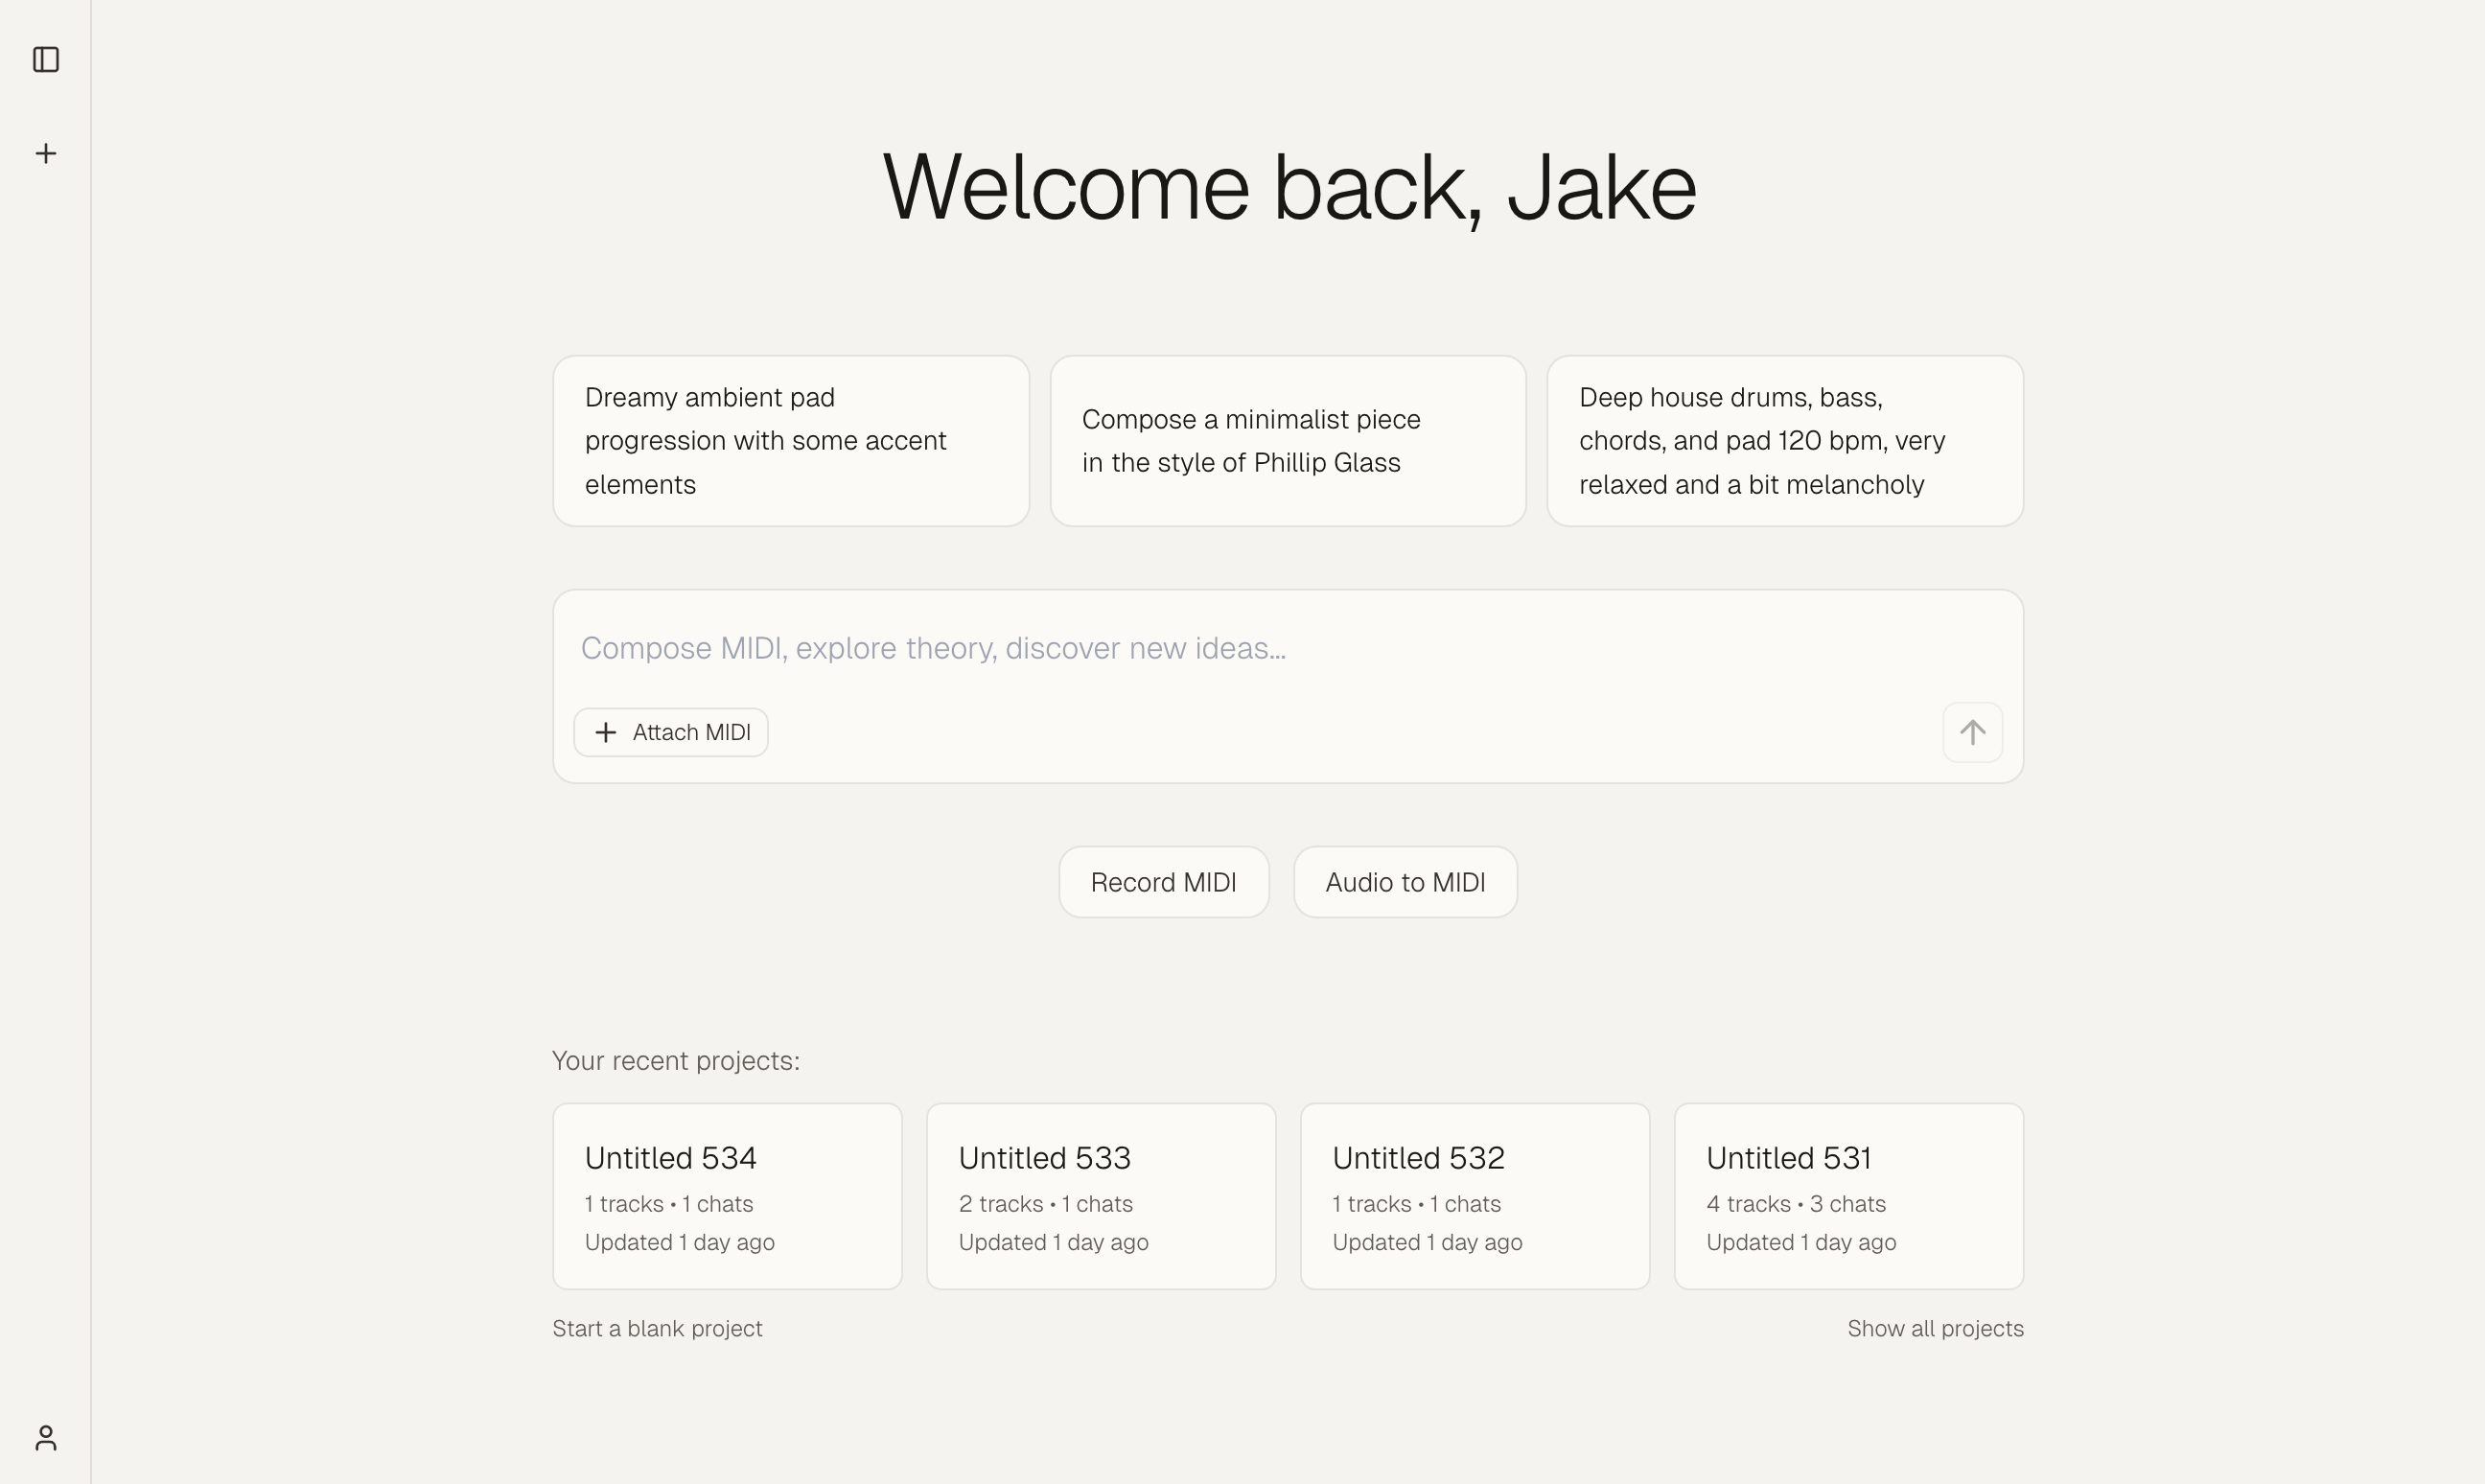
Suggested prompts
Click any of the rotating prompt suggestions to instantly create a project and send that prompt to Muse. The suggested prompts can be removed in the settings menu.
Custom prompt
Type your own idea in the text area and press Enter (or click the send button) to create a project and start a conversation with Muse.
Attach MIDI files
Before sending a prompt, you can attach up to 3 MIDI files (max 10MB each). Muse will create tracks for these in the workspace, and the AI will see them for further edits/accompaniment. Click Attach MIDI to select files.
Record MIDI
Click Record MIDI to enter recording mode. Connect a MIDI keyboard or controller and record your performance directly into the piano roll.
Audio to MIDI
Click Audio to MIDI to open the audio-to-MIDI tool. Record audio directly or upload an audio file, and Muse converts it to MIDI. This tool is designed to convert audio for a single instrument/voice to MIDI, not full songs.
Choosing a Project
If you have existing projects:
- Recent projects appear on the Start view. Click one to open it.
- Start a blank project creates a new project with an empty track.
- Show all projects opens the full project list for selection or management.
3. The Workspace Layout
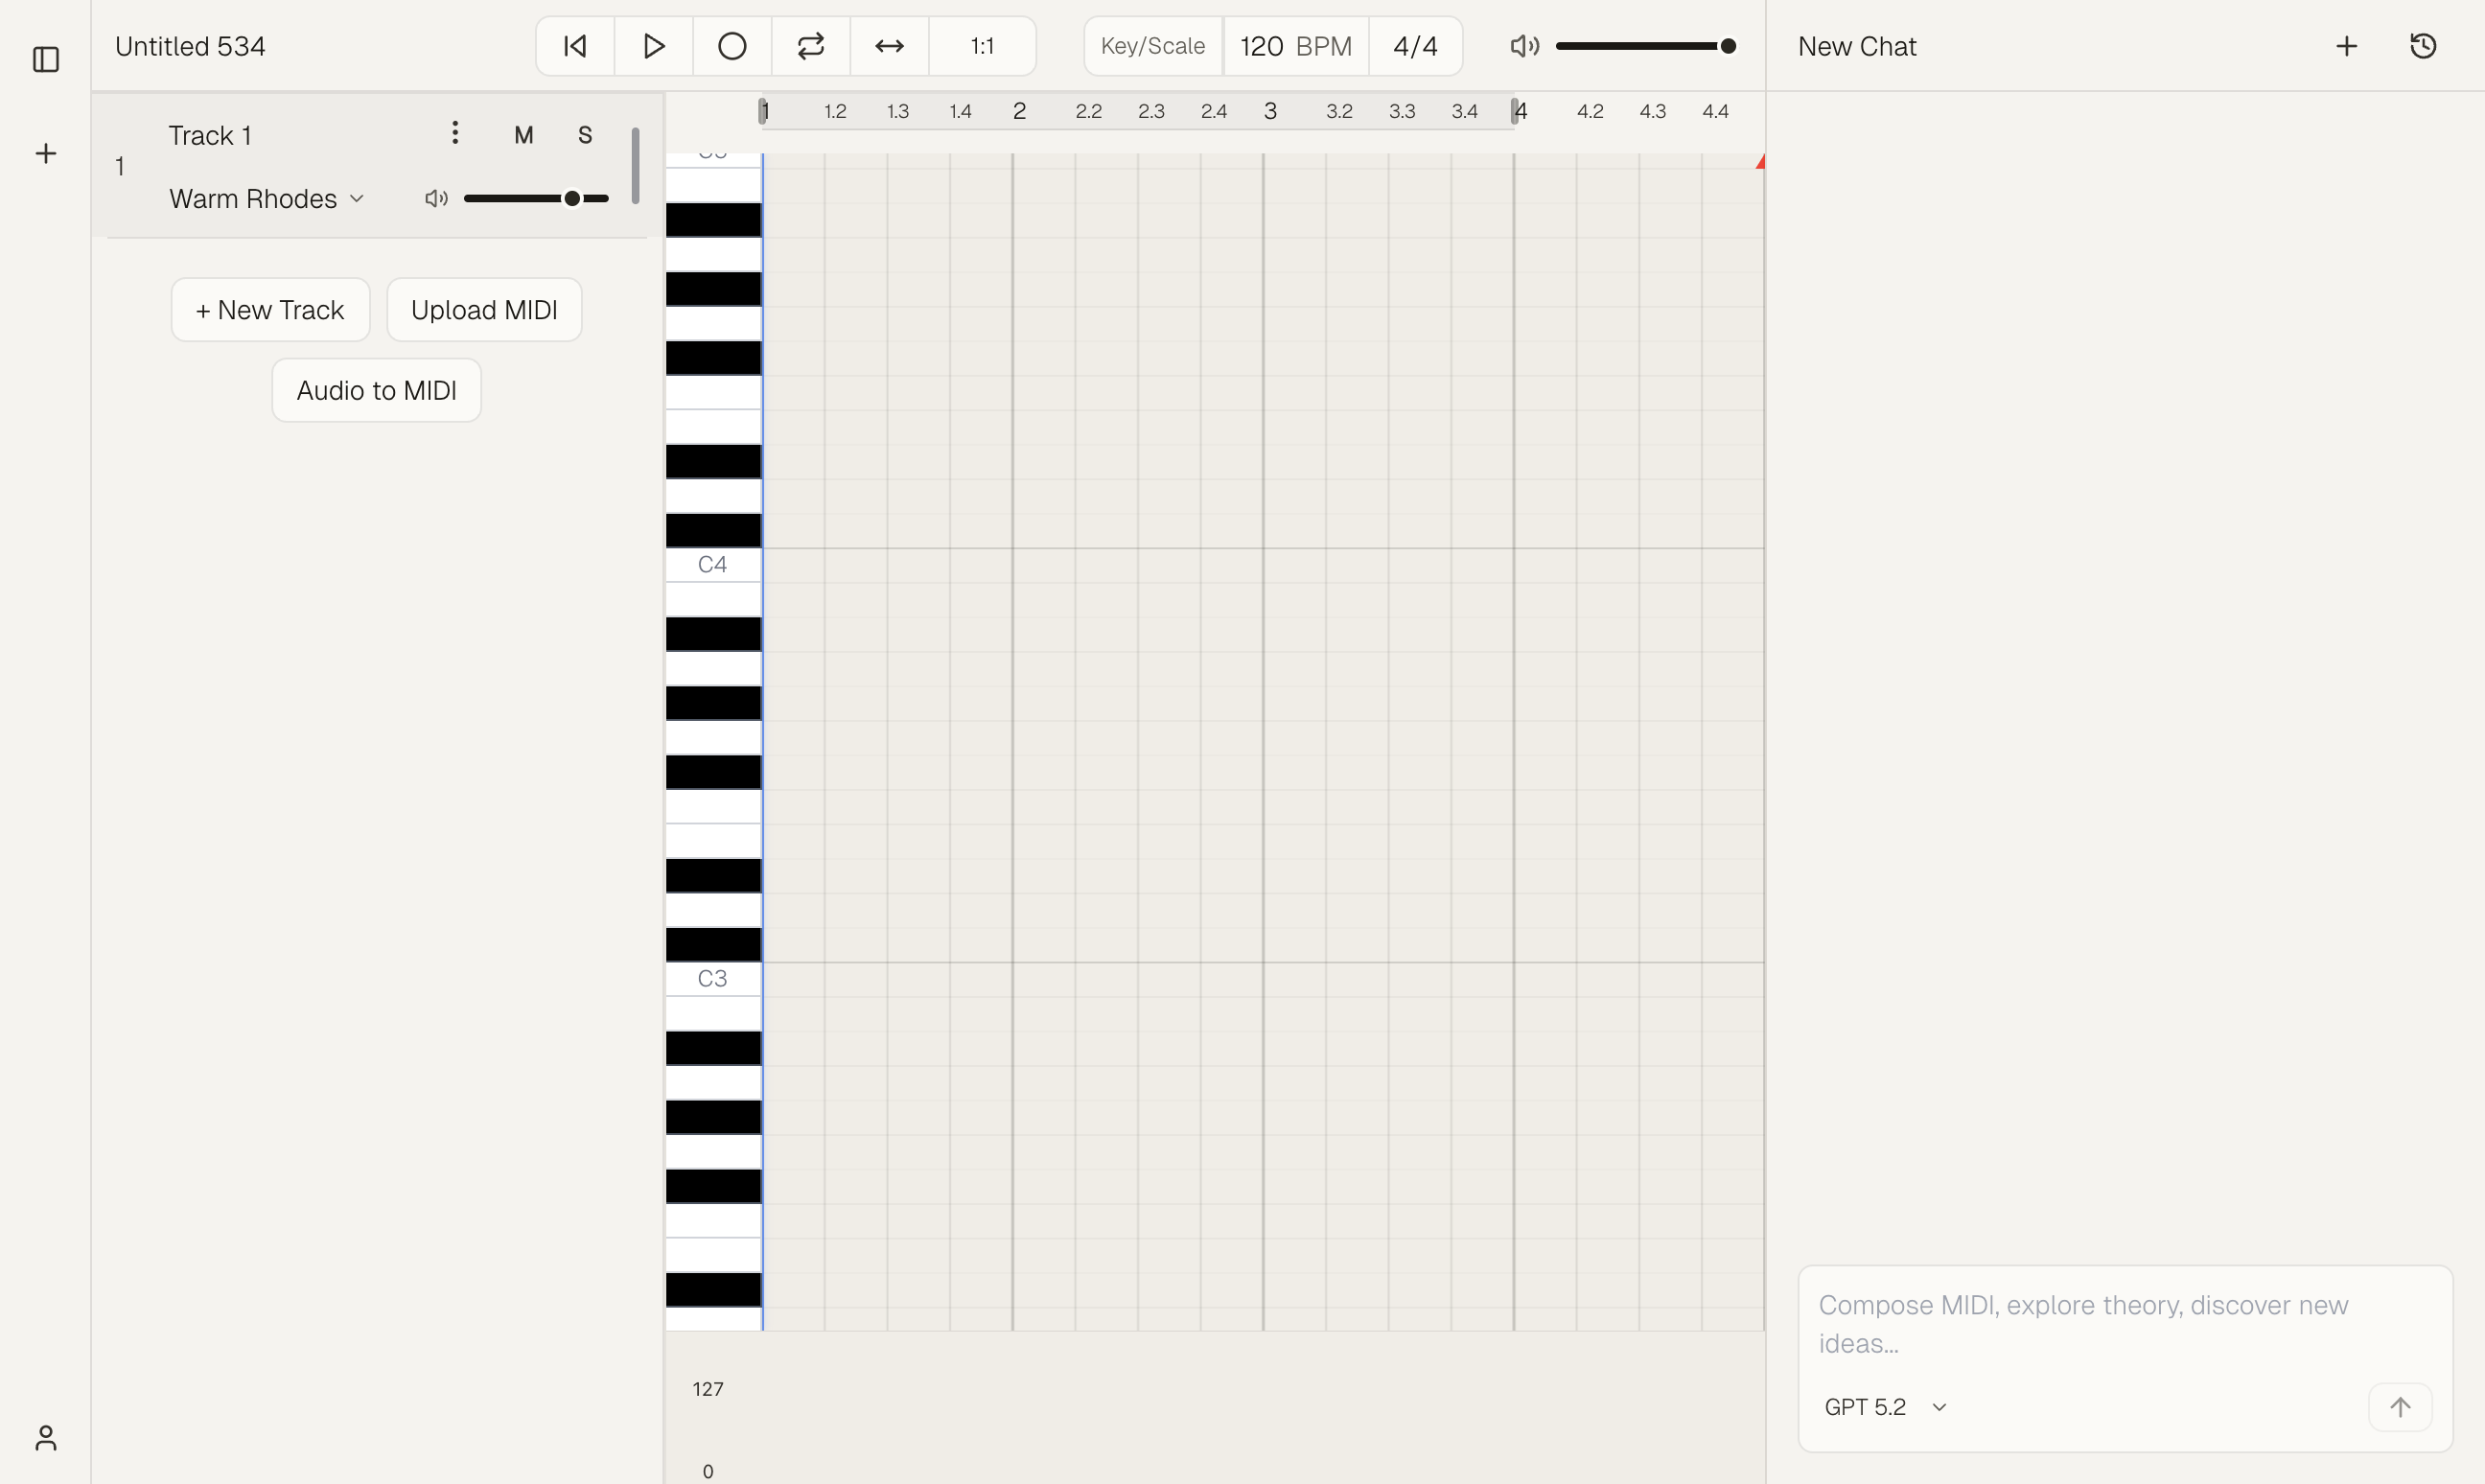
Main Areas
| Area | Description |
|---|---|
| Tracks panel | Left side. Lists all tracks in the project. Switch tracks, add new ones, change instruments. |
| Piano roll | Center. The main editing view. Notes are displayed on a grid (pitch vs. time). |
| Chat panel | Right side. Your conversations with Muse scoped to this project. Send prompts, see responses, and use follow-up suggestions. |
Control Bar
The control bar above the piano roll provides:
- Play / Pause – Start or stop playback
- Record – Start recording MIDI input
- Loop region – Set start and end points for looping during playback
- Follow playback – Scrolls horizontally during playback to keep the playhead visible
- Tempo – Project BPM (20–300)
- Key/Scale – Select the musical key and scale.
- Global volume – Master volume slider (−40 dB to 0 dB)
Sidebar and Pop-Up Menu
The sidebar on the far left provides project navigation and account access. It can be collapsed (icon-only) or expanded (full width). Click the panel icon or the collapsed bar to toggle.
When expanded, the sidebar shows:
- Muse logo – Links to the home page
- New Project – Create a new project
- Recent projects – List of your projects with name, last updated, and track/chat counts. Click a project to open it.
- Project menu – Hover over a project and click the three-dot menu (⋮) for:
- Rename – Change the project name
- Duplicate – Create a copy of the project
- Delete – Remove the project (you’ll be asked to confirm)
- Account – Your profile at the bottom. Click to open the account pop-up menu.
Account pop-up menu:
- Upgrade plan – View subscription options
- Settings – Open the settings page (start view options, default models, etc.)
- Help / Bug report – Report issues or get support
- Download MIDI – Export the current project as MIDI. Each track will be its own .mid file (when a project is open)
- Download WAV – Export the current project as an audio file (when a project is open)
- Keyboard shortcuts – Hover to see a reference of all shortcuts
- Download app (web only) – Install the desktop app
- Log out – Sign out of your account
Resizable Panels
- Drag the dividers between panels to resize.
- Use the panel toggles accessible from settings or right-clicking empty space in the piano roll to show or hide the chat and tracks panels.
4. Chatting with Muse
What the AI Can Do
Muse's AI agent can be used for a wide range of tasks:
Creative & emotional
- "Make it more melancholic"
- "Evoke the essence of water flowing in the melody"
- "Dreamy, floating feel"
Explanatory
- "What is the relevant music theory behind this composition?"
- "The melodic line feels detached, how can we improve our voice leading?"
- "How can I take this piece and create more tension in the first half?"
Specific edits
- "Make the bass more syncopated"
- "Edit the fourth chord to resolve incompletely"
- "Transpose to D minor"
Style & genre
- "J Dilla style, loose and swung"
- "Minimalist modern classical, Philip Glass inspired"
- "80s synthwave, nostalgic"
Follow-Up Suggestions
After Muse responds, you may see clickable follow-up prompts (e.g., "Add a counter-melody in the chorus", "Make the bass more syncopated"). These are AI-generated suggestions on where to take the track next. Click one to send it as your next message.
Model Selection
Muse provides access to leading AI models, and is quickly updated when new model releases happen to ensure you always have access to the most sophisticated AI.
Some models can be very expensive, so they are not provided in the free tier and require a Muse Pro subscription.
As of 3/1/26:
- Free tier models – Available to all users
- Gemini 3 Flash, Gemini 3.1 Pro, GPT-5.4, Claude Haiku 4.5, Claude Sonnet 4.6, Grok 4, Kimi 2.5, Minimax 2.5, GLM-5
- Premium tier models – More expensive to run, require Muse Pro
- GPT-5.2 High, Claude Opus 4.6
Use the model selector in the chat input area to switch models. Your choice can affect response quality and creativity. Different models have different personalities and musical intuition, so experimentation is encouraged.
Context Awareness
In the context of your project, Muse is aware of:
- Project settings – Tempo, key, scale, time signature
- Conversation history – Previous messages in the chat
- Project tracks - Per-track MIDI, instrument selection, volume, name, and more. Can be dynamically fetched into context by the agent
- Current track - Information on which track is currently active in the Tracks List.
5. AI Edits & Previews
How Previews Work
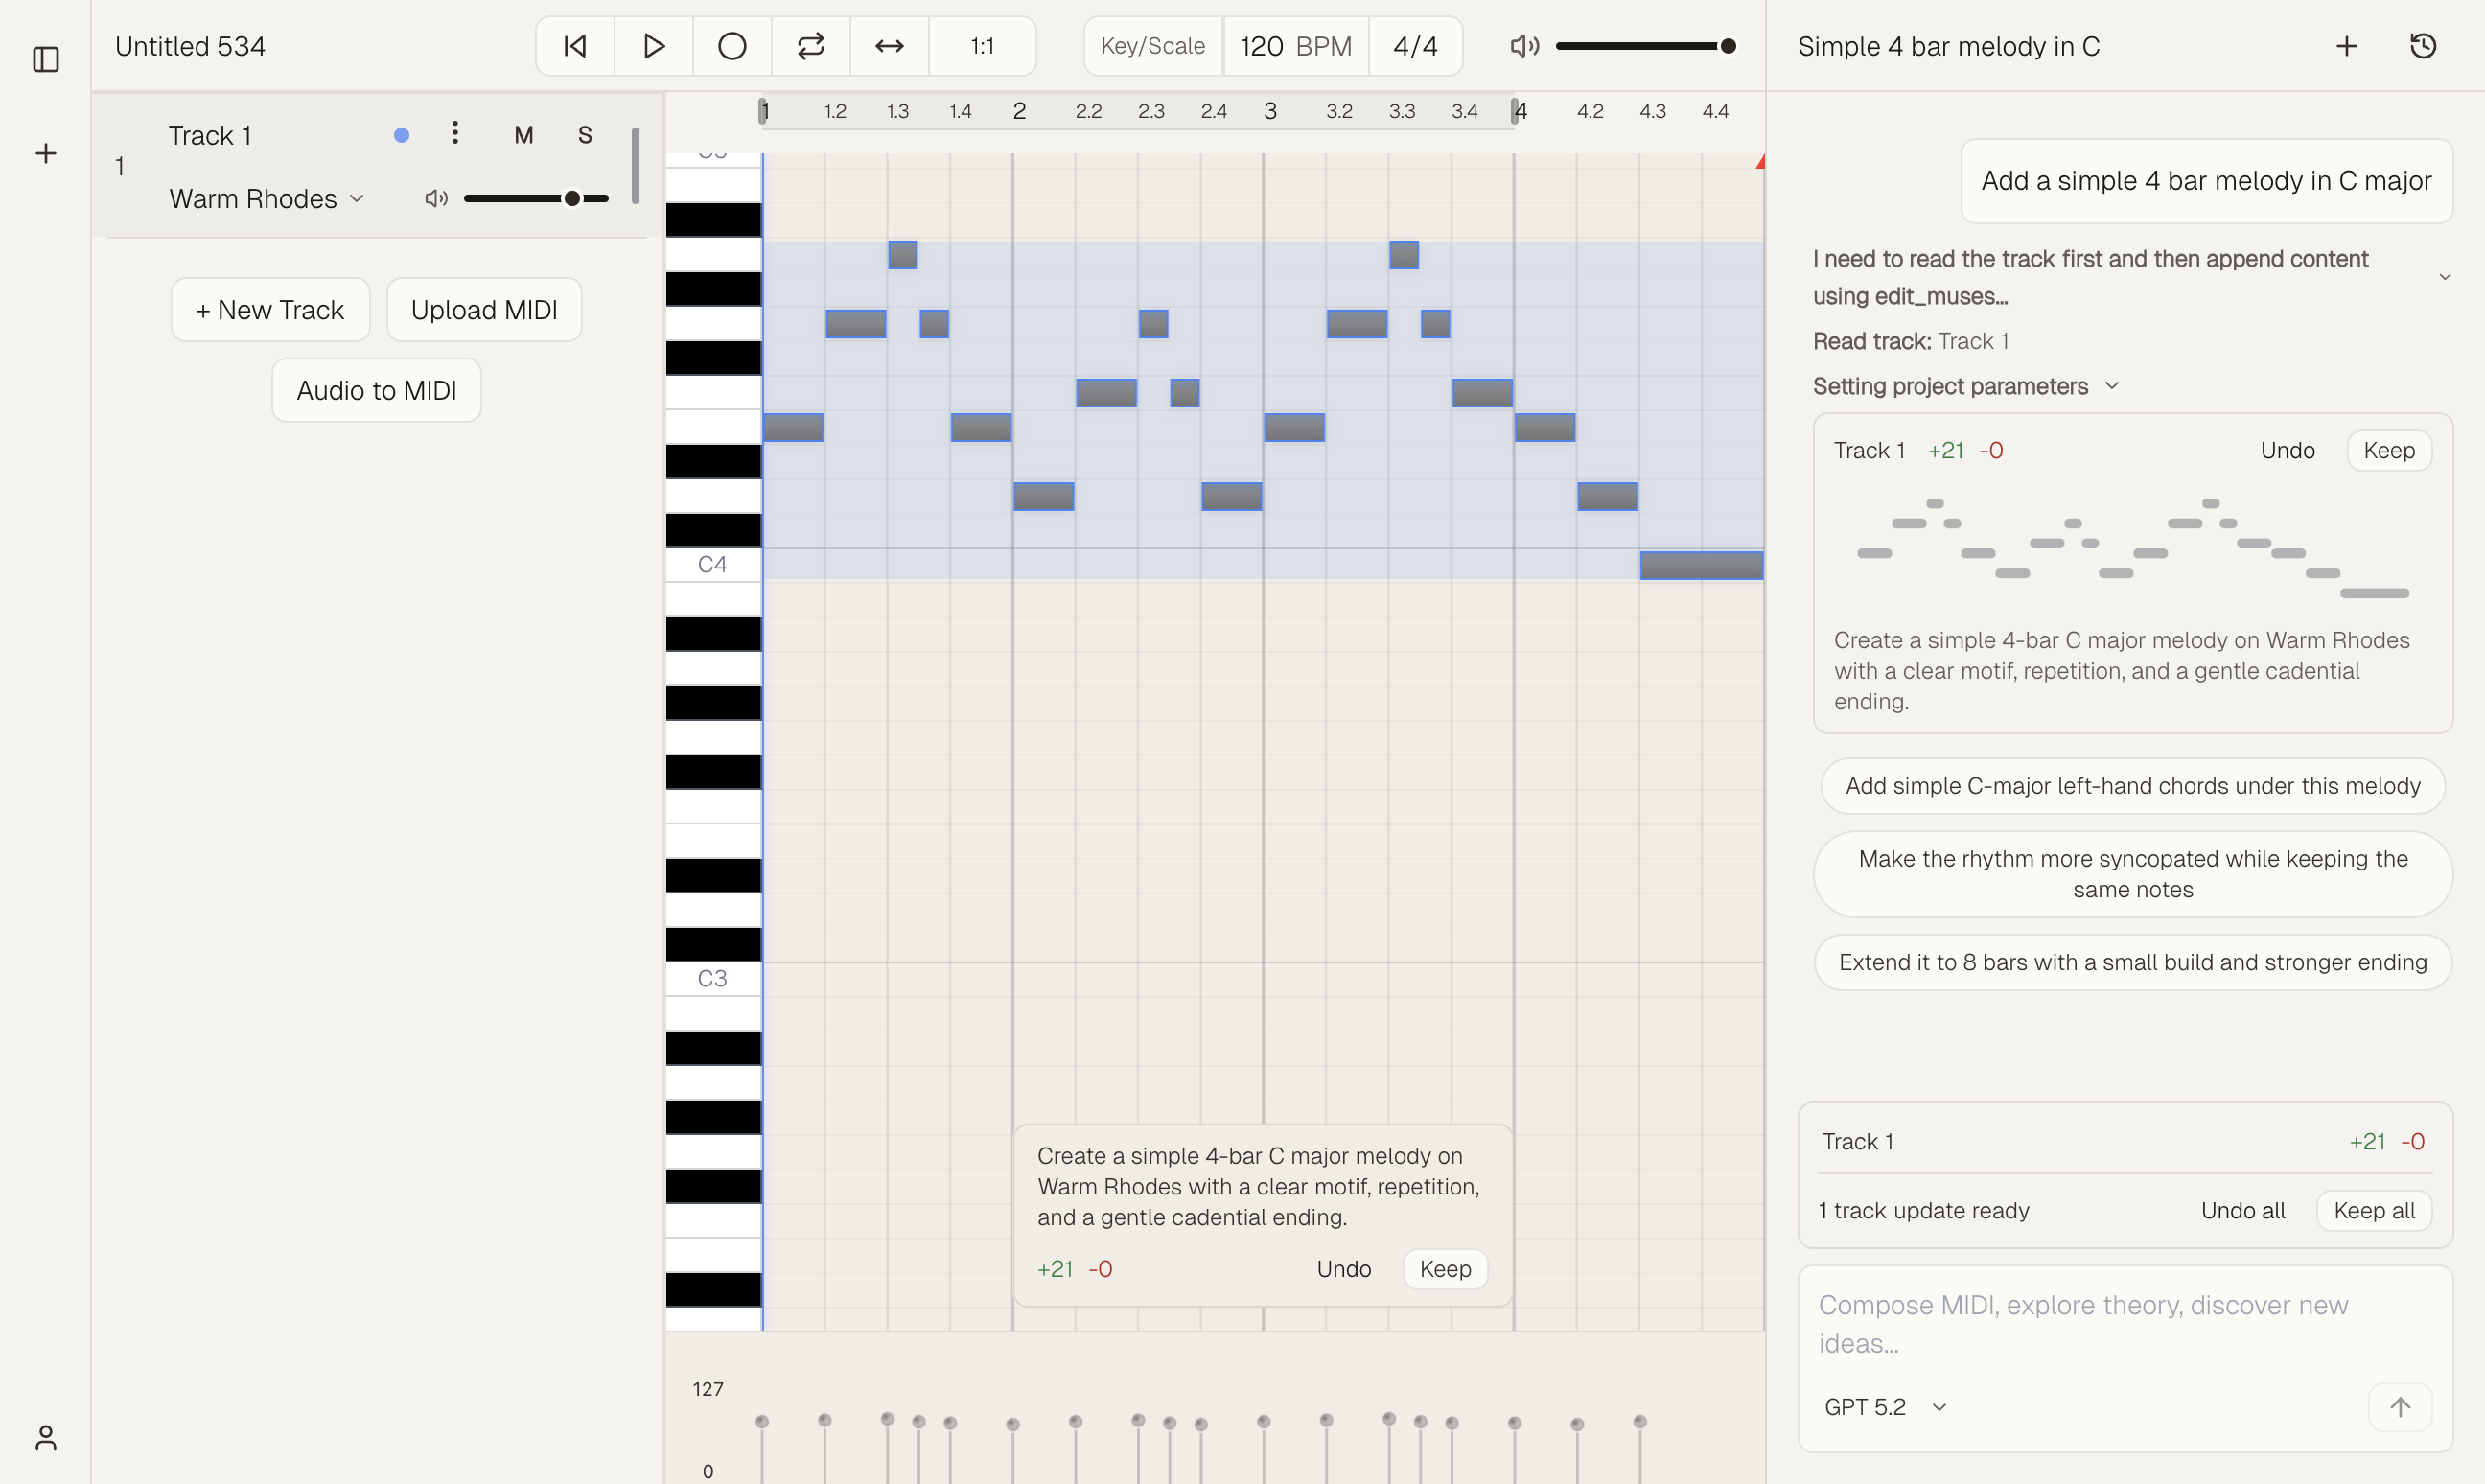
When Muse makes edits to your composition, it applies the changes to the MIDI in a preview state.
The preview state is able to be auditioned through normal playback. You can Keep or Undo the preview using the preview indicator in the chat, or the overlay on the active track for the piano.
This lets you try ideas without committing until you’re satisfied. The screenshot in the Chatting with Muse section shows a typical response with preview controls and follow-up suggestions.
Batch Previews
If Muse makes edits to multiple tracks in one chat, you may see a batch preview bar with options to:
- Keep all – Keep edits in bulk
- Undo all – Discard edits in bulk
It is recommended to handle all preview states (keep or undo changes) before sending follow up messages to the AI, though this is not required.
When Manual Editing Is Blocked
While a preview is active, manual editing in the piano roll is disabled. You must Keep or Undo the preview first. This keeps the composition state consistent.
6. Tracks & Projects
Tracks
Each project contains one or more tracks. Each track has:
- Name – Editable
- Instrument – The sound used for playback (Piano, Rhodes, Drums, etc.)
- Color – For visual organization
- Volume, Mute, Solo – Mixer-style controls
Add a track: Use the tracks panel to create a new track. You can ask Muse to "add a bass track" or "create a new track for pads."
Switch tracks: Click a track in the tracks panel to make it the current track. The piano roll and chat context update accordingly.
Instruments
- Change instrument: Click the instrument name on a track to open the instrument selector.
- Instrument and composition: Muse composes with the track’s instrument in mind. Changing the instrument can change how the part is written or interpreted.
Project Settings
Project-level settings apply to all tracks:
- Tempo (BPM)
- Key (e.g., C, D minor)
- Scale (e.g., Major, Dorian, Blues)
- Time signature (e.g., 4/4, 3/4)
You can change these in the control bar or ask Muse: "Set the tempo to 128" or "Change the key to A minor."
7. Piano Roll and Playback
Piano Roll Basics
Muse includes a standard piano roll. If you've worked in a MIDI editor or DAW-based piano roll, it should feel very familiar.
- Timeline bar – The ruler at the top shows bar numbers and beat markers, the loop region (when set), and the playback start marker. A narrow clickable band below it lets you set where playback begins.
- Horizontal axis – Time (bars and beats). Dependent on the grid size.
- Vertical axis – Pitch (piano keys on the left)
- Note length – Shown by the width of each note block
- Velocity Lane – Shown below the note grid when enabled; displays editable velocity bars for each note.
- Velocity – Shown by color or brightness in the bottom velocity lane (more intense color = louder).
Zoom & Scroll
You can control the horizontal time range and zoom in various ways using handy keyboard shortcuts. These are displayed in the Keyboard Shortcuts tab in the pop-up menu at the bottom left of the workspace.
- Scroll horizontally – Shift + scroll (or drag the timeline)
- Zoom bars – ⌘/Ctrl + scroll
- Zoom note height – ⌘⇧/Ctrl⇧ + / or −
- Zoom app – ⌘/Ctrl + / or −
Playback
- Space – Play or pause
- Loop – Set loop start/end by dragging in the timeline bar; toggle the Repeat button in the control bar to enable looping
- Tempo – Adjust in the control bar; affects the whole project
Setting Start Marker for Playback
Click in the narrow band directly below the loop bar (the lower part of the timeline ruler) to set where playback will start. The playhead jumps to that position and playback begins from there when you press Play. Click again on the same spot to clear the start marker and return to default behavior (start from the beginning, or from the loop start when looping is enabled).
Looping Playback
Set a loop region by dragging the loop handles in the timeline bar to define start and end points. Enable looping with the Repeat button in the control bar. When looping is on, playback repeats between the loop start and end. The loop region is highlighted in the timeline when active.
Scale Highlighting
When enabled (in Settings), keys that belong to the selected scale are highlighted on the piano keyboard with a blue tint. This helps you stay in key when composing or editing. The project's Key and Scale (set in the control bar) determine which keys are highlighted.
Velocity Lane Visibility
The velocity lane can be toggled by right-clicking the piano roll and choosing "Show velocity lane" or "Hide velocity lane", or in Settings under "Velocity lane".
8. Manual MIDI Editing
You can manually add, delete, and edit notes in the piano roll. Note that some actions like using arrow keys and creating notes with Enter are dependent on the piano roll grid size.
| Action | How |
|---|---|
| Select | Click a note. |
| Select Multiple Notes | Shift+click or drag to marquee-select |
| Select All Notes | ⌘/Ctrl+A (when not typing in chat) |
| Move | Drag a note horizontally (time) or vertically (pitch), or use the arrow keys |
| Resize | Drag the edge of a note to change its duration. |
| Change velocity | Drag the velocity handle or use the velocity editor. |
| Create note | Double click, or place the cursor and press Enter. |
| Delete | Select notes and press Delete or Backspace. |
| Move Up/Down octave | Select notes and press ⌘↑ / ⌘↓ (Mac) or Ctrl+↑ / Ctrl+↓ (Win/Linux). |
9. MIDI Input Methods
Outside of AI generations, there are a number of ways to manually input notes to the piano roll.
MIDI Controllers and Live Monitoring
Muse supports most MIDI controllers. After connecting a MIDI keyboard or controller to your computer, it should be auto-detected by Muse upon loading the workspace.
If it is not auto-detected, or if you have multiple controllers, you can select the one you would like Muse to use in the app settings accessible from the pop-up menu at the bottom left.
You can monitor live playback for the active track by playing your MIDI controller or using the home row of your computer keyboard.
Recording MIDI
To start recording MIDI, simply click the Record button in the control bar, or click Record MIDI if in the Start view.
Your performance is captured as MIDI notes in the active track.
Audio to MIDI
Muse provides a simple Audio to MIDI tool that can convert single instrument/vocal recordings or audio files to MIDI.
- Click Audio to MIDI on the Start view, or below the Track list in the workspace to open the Audio to MIDI modal.
- Allow microphone access when prompted, or upload a mp3
- Sing a melody or record an acoustic instrument. Muse converts your audio to MIDI notes.
- Use the provided settings to fine-tune the conversion. When ready, the MIDI will be added to a new track.
Upload MIDI
- Start view: Attach up to 3 MIDI files before sending a prompt. Muse uses them as context and adds each to its own track.
- Workspace: Use the MIDI upload button to import a MIDI file into the project. Muse will create a new track for it, and the AI will be able to see it like a normal track for edits/accompaniment
10. Downloading MIDI
There are a few options for getting MIDI out of Muse.
- Download All Tracks: Bulk export MIDI for the project by selecting the Download MIDI option from the Account pop-up menu. Each track in the project will be exported as a .mid file.
- Download Individual Track: Download MIDI for a specific track by clicking the three-dot menu (⋮) for the track and selecting Download MIDI.
- Drag and Drop: You can easily move MIDI out of Muse by clicking and holding the track number to start the drag, then dropping into your DAW/desktop. Due to web browser limitations, this feature is only available in the desktop version of Muse.
11. Keyboard Shortcuts Glossary
Muse supports some keyboard shortcuts for easy navigation and editing. A quick reference for shortcuts can be found in the Keyboard Shortcuts row in the pop-up menu in the bottom left.
Piano Roll & Editing
| Action | Mac | Windows/Linux |
|---|---|---|
| Play / Pause | Space | Space |
| Undo | ⌘Z | Ctrl+Z |
| Redo | ⌘⇧Z | Ctrl+Shift+Z |
| Copy | ⌘C | Ctrl+C |
| Cut | ⌘X | Ctrl+X |
| Paste | ⌘V | Ctrl+V |
| Select all | ⌘A | Ctrl+A |
| Delete selected | Delete / Backspace | Delete / Backspace |
| Add note at cursor | Enter | Enter |
| Move selection ±1 octave | ⌘↑ / ⌘↓ | Ctrl+↑ / Ctrl+↓ |
Zoom & View
| Action | Mac | Windows/Linux |
|---|---|---|
| Scroll piano roll left/right | Shift + scroll | Shift + scroll |
| Zoom in/out (displayed bars) | ⌘ + scroll | Ctrl + scroll |
| Zoom in/out (note height) | ⌘⇧ + / − | Ctrl+Shift + / − |
| Zoom in/out (app) | ⌘ + / − | Ctrl + / − |
Special
| Action | Mac | Windows/Linux |
|---|---|---|
| Toggle Synthesia mode | ⌘⇧V | Ctrl+Shift+V |
Note: Shortcuts are disabled when typing in the chat input.
12. Settings & Preferences
Open from the account pop-up menu (bottom-left) → Settings. Some key settings to now about:
Credits
View and manage your current plan. See your credit usage for the current period. See credits docs for more information on credits and how they are used.
Promo codes
If you have a code, this is the only place to enter it. Enter in Have a promo code? and click Redeem. Some codes grant premium model access.
BYOK
Pro only. Use your own OpenAI, Anthropic, or Google API keys. Keys are safely encrypted and never returned the client after being added. Click Manage → enter key → Save → toggle Use my key. Remove deletes a key.
Start View Customization
- Welcome header – Personalized greeting
- Prompt suggestions – Rotating prompt buttons
- Recent projects – Recent projects list
MIDI Recording
- MIDI input – Device selector (or All Inputs). Shows No MIDI / MIDI Blocked if none or denied.
- Monitor input – Hear incoming notes through the active track while idle
- 1-bar count-in – Metronome bar before recording starts
- Quantize on record – Snap notes to grid (off = unquantized)
Workspace Customization
- Scale highlighting – Highlight scale keys on the piano keyboard
- Tracks / chat panel – Show or hide each panel
- Velocity lane – Show or hide velocity editing below the piano roll
13. Troubleshooting & FAQ
I can’t edit the piano roll
A preview may be active. Manual editing is disabled until you Keep or Undo the AI’s changes. Complete the preview flow first.
How do credits work?
Credits are charged for each successful request. The amount of credits a request costs is determined by the pricing of the model used for the generation, and the number of tokens generated. Learn more at credits docs
How do I export my music?
Use the Download option (e.g., from the account pop-up menu) to export the current composition as MIDI files. If using the desktop version of Muse, you can drag and drop MIDI files by clicking and holding the track number to start the drag.
Where is my work saved?
All projects, tracks, and chats are saved automatically to your account in the background.
Getting help
Use the Help / Bug Report option in the account menu to contact the Muse team with questions or problems.
Feature request
Ideas for how to improve Muse are welcome! Most feature requests from users are added to the app eventually. Feel free to use the Help / Bug Report option in the account menu, or reach out directly through email hi@muse.art or X/twitter @jakemclain_ to get in touch.